Software Environment
Throughout this assignment, only Windows platform is supported. No Mac OSX or Linux please. If you don't have a PC, find one.
Contents
Processing
Download processing. Please make sure you are downloading the standard Windows version 0135, not the latest releases. Or download it here: processing-0135.zip
- Create a directory "Programs" on the C: disk, in the root. If "C:\Programs" exists already, skip this step.
- Extract the entire directory to C:\Programs (note, not "C:\Program Files"). if you are reinstalling Processing, remove the entire processing directory first.
Creapro Java library for Processing
This library adds the support for Arduino and AdMoVeo to Processing.
Download creapro.jar
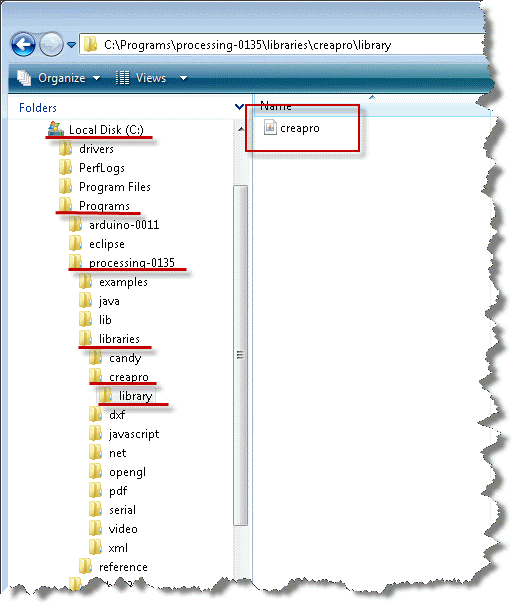
- In C:\Programs\processing-0135\libraries, create a sub-directory "creapro".
- In C:\Programs\processing-0135\libraries\creapro, create a sub-directory "library".
Place creapro.jar in C:\Programs\processing-0135\libraries\creapro\library. After this procedure, your should have a directory tree as below:
Arduino software
Download Arduino software Please make sure you are downloading the Windows version 0011, not the latest releases.
- Create a directory "Programs" on the C: disk, in the root. If "C:\Programs" exists already, skip this step.
- Extract the entire directory to C:\Programs (note, not "C:\Program Files"). if you are reinstalling Arduino software, remove the entire Arduino directory first.
Assemble the AdMoVeo robot
- loose the four screws that fix the PCB on the platform.
- lift the upper PCB up carefully.
install four rechargeable AA batteries >= 2000mAh. pay attention to the "+" and "-" indicators.
 DO NOT TRY TO CHARGE NORMAL AA BATTERIES!
- put the PCB back to its position and fasten the screws.
- remove the power selection jumper on the Arduino board, if the jumper is there. You may found it by looking for "PWR_SEL" on the PCB.
- carefully install the Arduino board onto the robot platform. Pay attention to the orientation. Do not force the Arduino board onto the platform if it does not fit.
- You may need to charge the batteries first. The batteries can only be charged when the robot is switched off. When the robot is on, the batteries are not being charged at the same time. You need the power adapter to charge the batteries:
- Set the power adapter to 9 Volts.
- Connect the fitting plug for the arduino board onto the adapter so that the + is inside and the - is outside (watch the symbols on the plug, the arrows must match).
IDuino firmware for the AdMoVeo robot
see IDuino for Details.
Test the AdMoVeo robot
Download the test program and see whether everything works as expected. see AdMoVeo for details.

