Software Environment
Throughout this assignment, only Windows platform is supported. No Mac OSX or Linux please. If you don't have a PC, find one.
Installing Processing
Download processing. Please make sure you are downloading the latest release. There are two versions, one with Java, one without. If you are not sure, download the one with Java.
- For those who knows what the JDK is and wants to install Processing along with JDK: You need x32 version of the JDK no matter whether you are running an x32 or x64 system.
- Create a directory "Programs" on the C: disk, in the root. If "C:\Programs" exists already, skip this step.
- Extract the entire directory to C:\Programs (note, not "C:\Program Files"). if you are reinstalling Processing, remove the entire processing directory first.
- Create a shortcut on your desktop to "Processing.exe" for easy access.
Note, if you are running Windows Vista or Seven, you might have to run Processing in "Windows XP compatibility mode" and also you should run it with Administrator rights, or you will encounter problems such as difficulties in accessing the functions in the Help menu.
Install the Creapro libraries
- Determine your Sketchbook location, the Processing Sketchbook location is your working directory for your sketches and also for your libraries.
- Start Processing.
Select File -> Preferences.
- Check your Sketchbook location.
Install Creapro Java library for Processing
This library adds the support for Arduino and AdMoVeo to Processing.
Download creapro.jar
- In "Processing Sketchbook location"\libraries, create a sub-directory "creapro".
- In "Processing Sketchbook location"\libraries\creapro, create a sub-directory "library".
Place creapro.jar in "Processing Sketchbook location"\libraries\creapro\library.
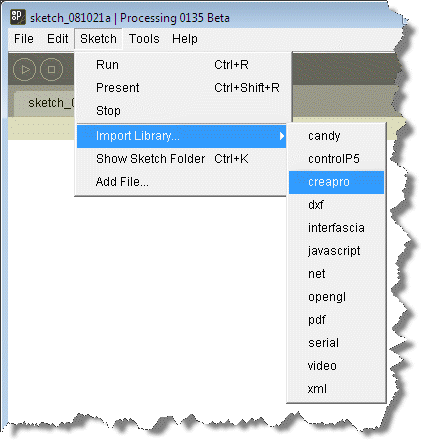
In Processing, you should be able to import the creapro library as shown below:
Notice that what you see in your Processing might be slightly different because of different versions
Install ControlP5 library for Processing
This library adds a GUI library to Processing.
Download controlP5_0.3.14.zip from this wiki, or from its website
- Open the zip file, extract, copy the direcotry "controlP5" into "Processing Sketchbook location"\libraries"
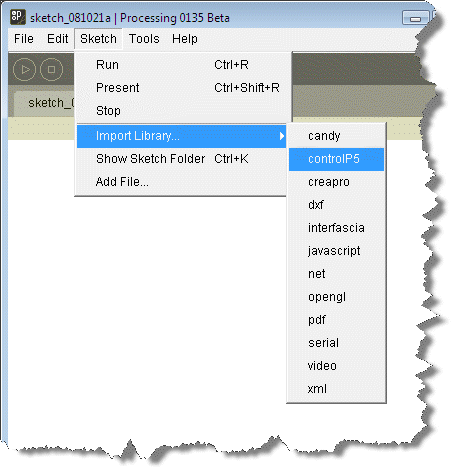
After this procedure, you should be able to import the controlP5 library in Processing as shown below:
Notice that what you see in your Processing might be slightly different because of different versions
Arduino software
Download Arduino software Please make sure you are downloading the latest Windows version.
- Create a directory "Programs" on the C: disk, in the root. If "C:\Programs" exists already, skip this step.
- Extract the entire directory to C:\Programs (note, not "C:\Program Files"). if you are reinstalling Arduino software, remove the entire Arduino directory first.
AdMoVeo robot
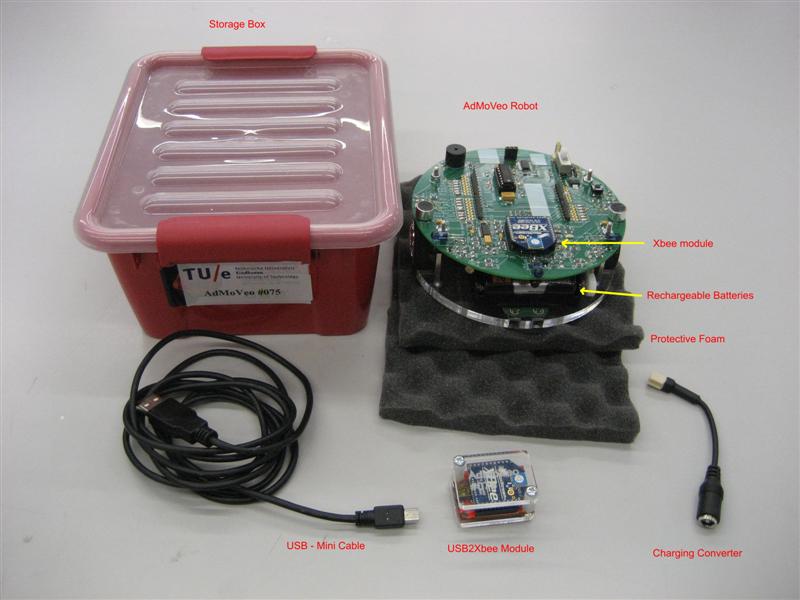
What you get (to loan)
- 1 numbered storage box.
1 numbered AdMoVeo.
1 wireless Xbee module placed on the AdMoVeo.
- 1 numbered USB2Xbee wireless module.
- 1 USB Cable (mini).
- 4 AA rechargeable batteries (Camelion 2500maH).
- 1 Charging converter.
- 2 foam pieces for protection.
What you need (to buy)
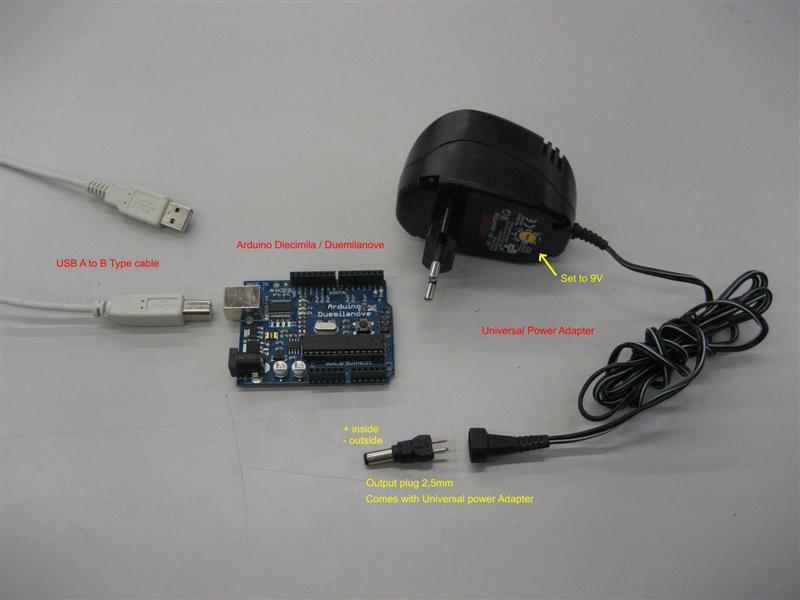
1 Arduino Diecimila or Duemilanove -> You can buy an Arduino at the servicedesk.
1 USB cable -> A-B Type
1 Universal Power Adapter, -> e.g. PA500 , you can also buy one in shops like kijkshop, mediamarkt or wiener electronics.
- The requirements for the power adapter are:
>=300mA minimum current
- 7,5V or 9V voltage selection
- 2,5 mm output plug, plus inside, minus outside.
Install the Arduino Board on your Robot
- If you have a Diecimila board remove the power selection jumper on the Arduino board, if the jumper is there. You may found it by looking for "PWR_SEL" on the PCB. You don't need to do this step if you have a Duemilanove board.
- carefully install the Arduino board onto the robot platform. Pay attention to the orientation. Do not force the Arduino board onto the platform if it does not fit.
Charge the AdMoVeo robot
 DO NOT REMOVE THE RECHARGEABLE BATTERIES!
- You may need to charge the batteries first. The batteries can only be charged when the robot is switched off. When the robot is on, the batteries are not being charged at the same time. You need the power adapter to charge the batteries:
- Set the power adapter to 9 Volts.
- Connect the Charging converter on the white connector near the On/Off switch.
- Connect the fitting plug for the charging converter (2.5 mm) onto the Universal Power Adapter so that the + is inside and the - is outside.
Connect the the Charging converter to the Universal Power Adapter to charge the AdMoVeo (Robot must be OFF to charge).
When the AdMoVeo is fully charged (after 10+ hours) you can continue with the next step.
IDuino firmware for the AdMoVeo robot
see IDuino for Details.
Test the AdMoVeo robot
Download the test program and see whether everything works as expected. see AdMoVeo for details.
References
CreaproProcessingLibrary: The creapro java package offers the library of classes and interfaces for controlling the AdMoVeo robot and the Arduino board within Processing.
IDuino: Firmware for Arduino to communicate to the creapro processing library and to drive the AdMoVeo robot. It is only needed in case you need to reload the firmware.


