|
Size: 2259
Comment:
|
Size: 3075
Comment:
|
| Deletions are marked like this. | Additions are marked like this. |
| Line 40: | Line 40: |
| * if you see this message, do not panic, do it accordingly. * {{attachment:NoJVM.JPG}} * you might need to install build tools: * {{attachment:installBuildTools.JPG}} |
* if you see this message, do not panic, do it accordingly. * {{attachment:NoJVM.JPG}} * you might need to install build tools: * {{attachment:installBuildTools.JPG}} |
| Line 46: | Line 46: |
| * if you see the message below when starting the android emulator: In the configuration of the virtual device you need to use ARM cpu instead if the intel one. If you cannot find ARM in the list of choices, you might have to go back to SDK manager to install relevant packages. * {{attachment:intel.jpg}} |
* if you see the message below when starting the android emulator: In the configuration of the virtual device you need to use ARM cpu instead if the intel one. If you cannot find ARM in the list of choices, you might have to go back to SDK manager to install relevant packages. * {{attachment:intel.jpg}} |
| Line 50: | Line 50: |
| === ANDROID_AVD_HOME === * When starting the android emulator, if it complaints that it can not find the <name of the AVD>.ini in "ANDROID_AVD_HOME" or "HOME" locations: 1. find out where your ANDROID_AVD_HOME actually is. In AVD manager, select the AVD, then press the button "Details". In the picture below, the path in the red ellipse is actually where ANDROID_AVD_HOME should be. * {{attachment:avddetails.jpg}} 1. Go to Control Panel\System and Security\System, then Advanced system settings, Advanced, Environment Variables, in the lower part of the dialog box about "System variables", press "New..." or if the ANDROID_AVD_HOME exists, press "Edit", make sure it looks like the following. Note: you have to fill out what is actually your ANDROID_AVD_HOME from Step 1. * {{attachment:avdhome.jpg}} |
Creative Apps 201502
Planning
- Week 1: Installation (Android Studio, Processing with Android Mode), and Hello World!
- Week 2: Processing with Android Mode
- Week 3: HTML5/Javascript I
- Week 4: HTML5/Javascript II
- Week 5: Android Native Apps I
- Week 6: Android Native Apps II
Week 1
- Presentations
 The following content was planned, but we did not manage to reach this point during the lecture. We leave this to a later time.
 - Code
- Homework and deliverables
If you have no experience with Processing, you are advised to follow GetStartedWithProcessing.pdf to learn the basics;
- Try out some examples from the Processing programming environment, to see how these examples would behave on the emulator or on your Android phone.
Create full screen visual art on Android, using Processing. See below some examples. (To get inspired, you may want to have a look at http://openprocessing.org)
- Create an Android app, display "Hello Eindhoven" in the center of the screen.
- What to be delivered (as one single ZIP file)
- source code
- screen copy of the output

Installation
Android Studio installation
- If you are asked to install JDK first:
- check if you have earlier versions of JRE or JDK installed. Uninstall previous versions.
- download the latest JDK for your system (32bit or 64bit).
- quit the installation program if it still running.
- restart the installation.
Start Android Studio
- if you see this message, do not panic, do it accordingly.
- you might need to install build tools:
CPU acceleration status
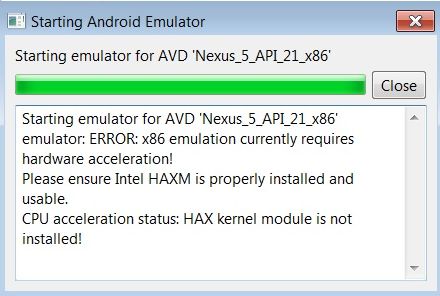
- if you see the message below when starting the android emulator: In the configuration of the virtual device you need to use ARM cpu instead if the intel one. If you cannot find ARM in the list of choices, you might have to go back to SDK manager to install relevant packages.
ANDROID_AVD_HOME
When starting the android emulator, if it complaints that it can not find the <name of the AVD>.ini in "ANDROID_AVD_HOME" or "HOME" locations:
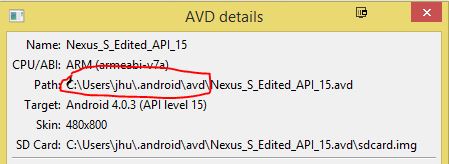
- find out where your ANDROID_AVD_HOME actually is. In AVD manager, select the AVD, then press the button "Details". In the picture below, the path in the red ellipse is actually where ANDROID_AVD_HOME should be.
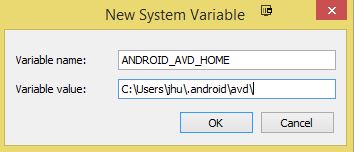
- Go to Control Panel\System and Security\System, then Advanced system settings, Advanced, Environment Variables, in the lower part of the dialog box about "System variables", press "New..." or if the ANDROID_AVD_HOME exists, press "Edit", make sure it looks like the following. Note: you have to fill out what is actually your ANDROID_AVD_HOME from Step 1.
- find out where your ANDROID_AVD_HOME actually is. In AVD manager, select the AVD, then press the button "Details". In the picture below, the path in the red ellipse is actually where ANDROID_AVD_HOME should be.


